Glam Lamp Transformation
Hello loverlies!
Have you ever been searching for a pair of lamps, but can’t find exactly what you are looking for? Yeah, me, too.
I keep a mental list of items I need so that when I am out hunting and picking I have an idea of what I am going to bring home. Now, I don’t always stick to that list, but that’s for another post.
Anyway, back to my hunt for a nice pair of lamps. I stumbled upon a pair of lamps that look like they came off the set of Mad Men. So very MCM, brassy brass and amber glass [yeah, I went with the rhyme]. It was the shape that caught my eye. When I go hunting for pieces, my brain flashed thru the details, the good bones and imagines several ways that I can transform it even before I buy it. Like, look at the detail in the brass footing and the delicate scrolls on top with the little holes. Oh, do you know what those little holes mean? These ladies need some drippy CRYSTALS!

My first thought was mercury glass. There are 2 products that I love for mercury glass projects.
One is from Rustoleum and the other is Krylon. You want the MIRROR finish, not a silver spray paint. It makes a huge difference.
So I wiped the entire lamp down with rubbing alcohol to remove any debris or oil (from its decades of use).

The tip is to mix vinegar & water and lightly mist the glass.
This prevents the paint from sticking to those spots, creating the mercury glass look.
First coat with a bit of the orange is still showing thru. Hmmm, I am not sure I want to see the orange peeking out.


Sometimes you have an idea of how the finished project is supposed to look. This is not what I was hoping for. It is a bit too shiny and, well, not quite right. It is OK if your vision does not meet your expectations. Makeover projects are all about trying something new. Besides, paint covers a multitude of sins.
I guess I will go with plan B.
I am thinking soft white with a bit of texture.

Let’s see, I mixed 2 tablespoons of sanded grout with 2 tablespoons of warm water. you can also use baking soda if you don’t have sanded grout laying around.
Once combined I added that to a cup of paint. It ended up as the perfect ratio of paint to texture. You can adjust according to your personal preference.
Now, I know what you are thinking “Are you seriously just going to paint on glass?”
Yup, I am. You can use a bonding primer, but in this case, the texture ends up helping the paint grab. Besides, have you ever painted window trim? You have to SCRAPE the paint off.
Can you see the texture? Nice action shot, eh? Boy, can I paint FAST!
Ohh, and take a look at the base. I sprayed it with the mirror paint but wiped off to tone down the brass. It ended up looking like a patina on silver. I love it.

I let the first coat dry overnight. Then a second coat to makes sure every nook and cranny was covered.

While the second coat is drying, I pulled out my collection of antique crystals. If I see them at a flea market, I grab them. So I have a TON to choose from. Crystals are so versatile and so pretty!
The spear point crystal is gorgeous, but I think it is too long for this lamp.


Oh, I think the faceted tear drop crystal will be PERFECT!


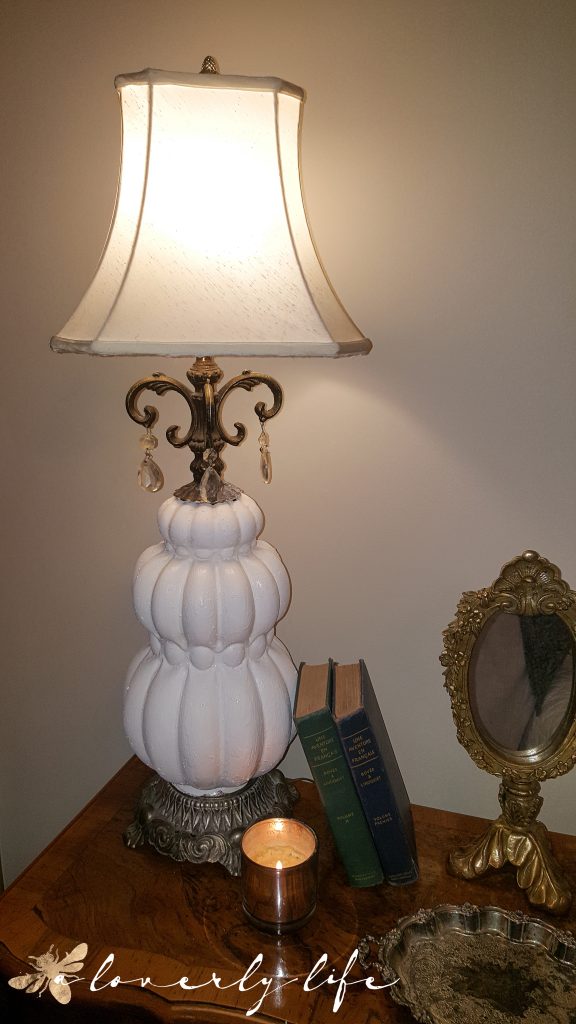
Now that the lamp has dried fully, I added the tear drop crystals.

and no more brassy brass

Quite a transformation from what we started with, don’t you think? Glam and perfect. Right now they are in the guest bedroom. They coordinate beautifully with the chandelier in that room.
Isn’t it amazing what you can do with a bit of paint and imagination? It wasn’t what I had originally envisioned, but I like them so much better in white.

Are you ready to tackle your own lamp project?
That’s loverly.
xo Juliet