DIY floor lamp sconces
What is a floor lamp sconce?
It is the perfect lighting solution, if you are like me and love the look of sconces, but live in a rental that does not have any sconces.
Or any lights in the living room, for that matter.
I enjoy living in my little loverly cottage.
Honestly, at this stage of my life [now that I am an empty nester] renting is so much easier.
Even the lawn mowing is covered by my lease, which leaves me more time for projects and for working on my butterfly garden.)

Not to mention, I don’t have to worry about any major repairs, should anything pop up!
Being near the lake is my other little bit of heaven.
I just love being able to walk to the beach whenever I want.
Warm days mean toes in the sand while scavenging for beach glass and fairy stones.
The past 4 years, I found creative ways to add my favorite touches of French country cottage style to my home.
Sometimes, rental homes can have some decorating challenges.
One of the challenges in this house is that my living room does not have any light fixtures.
Fireplace, yes.
As for living room lights, not a one.
Sure, I could use table lamps.
But they take up so much room on the end tables.
And floor lamps, but I just don’t like floor lamps in here.
I love the look of sconces, but to hard wire them would be an awful lot of work.
Not to mention that I am pretty sure my landlord would not appreciate my adding permanent fixtures.
Have you ever found yourself in a predicament like this?
Well, I had a BRILLIANT idea.
And there will be sconces.
You won’t believe how easy this is!
Here’s what you need to hang sconces in your rental without drilling a hole in the wall:
- Pair of sconces (unless you just need one)
- Pair of solid wood closet doors
- Paddle bit
- Drill
- Electrical tape
- Electrical wire caps
- Lamp Wire w/switch
optional:
- Sandpaper
- Finish for your doors (paint, stain and/or wax)
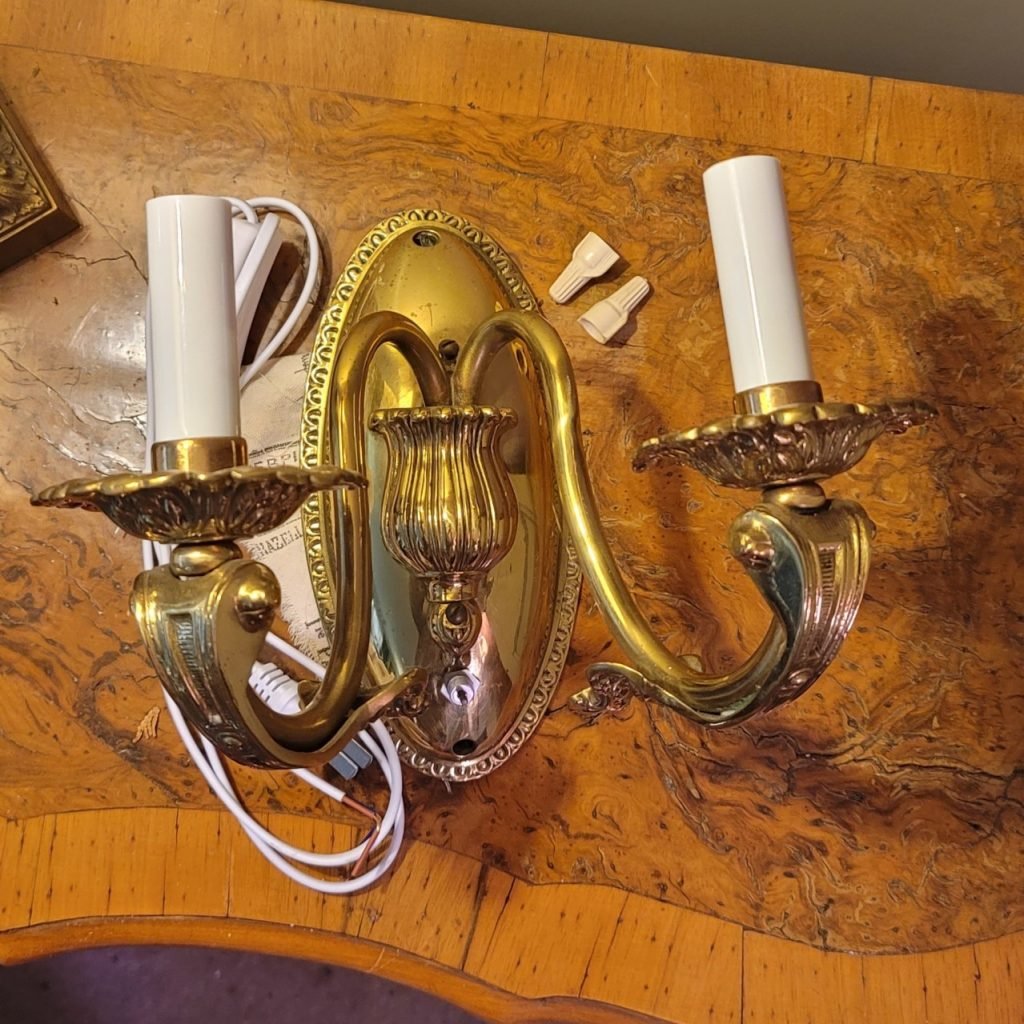
First you need a pair of sconces.
Of course, you don’t HAVE to make 2 of these, a single works just fine if that is all you need.
Check out this version I made with an antique door [perfectly distressed and accented with a bit of French country cottage glam]
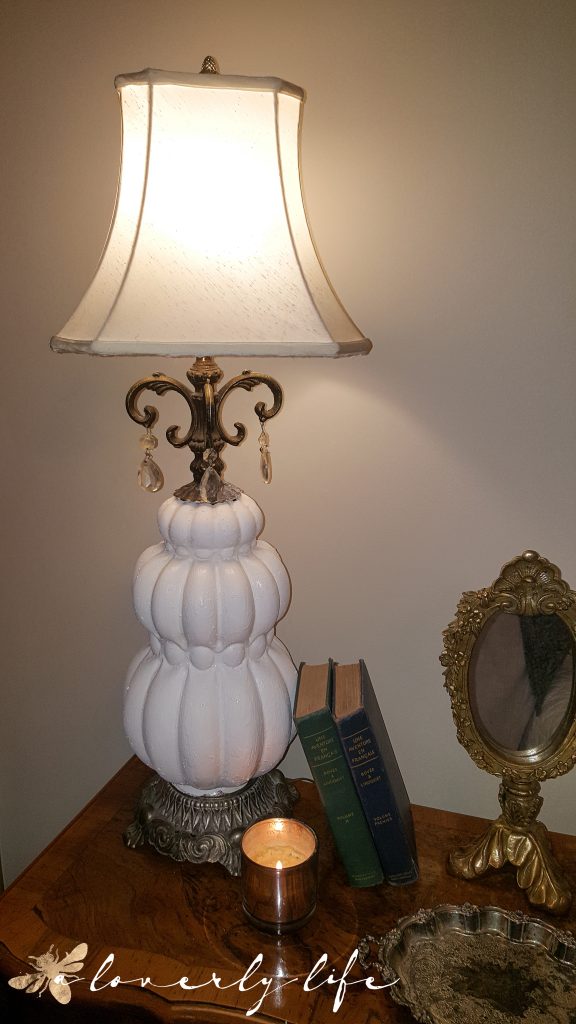
For this project I wanted to use this beautiful pair of antique sconces that I found at one of my favorite resale shops.
They make me swoon.
There were a few crystals missing, but I keep a stash of crystals just for situations like this.
I mean, just look at the beautiful curves and the detailed bobeches, I so love my thrifty find.
If I recall, it was only $15 or $20 for the pair!
These sconces were meant to be hard wired, but did you know that light fixtures can easily be converted so that you can plug them in?
All you need is one of these.

It’s a lamp wire.
I prefer the ones with a switch, but they are available without.
If you are going to be tinkering with anything electrical, electrical tape and caps will always come in handy.

Electrical tape is available in several colors, and white was perfect for this project.
Now that you have the pieces for the light fixture, you are going to need a way to hang them.
This is the brilliant part!
I have a collection of wood paneled doors.
All different sizes, some louvered and doors with recessed panels.
I love to use them for backdrops at market, so I always have a bunch tucked away SOMEWHERE.
See that blue paneled door on the left? That’s the type of door we want for this project.
Make sure the door is solid wood, not the flimsy builder grade or hollow door kind.
It needs to be sturdy to properly secure the sconce to it.
If you don’t have a pair of doors like this, you can often find them at garage sales, barn sales and thrift shops. Keep your eyes open, an you will find the perfect pair.

I had a pair that were painted soft white, with a bit of natural distressing from being schlepped around for years in the back of a trailer for my market displays.
They will be perfect for this project.
The last couple things needed for the project are a drill and a paddle bit.
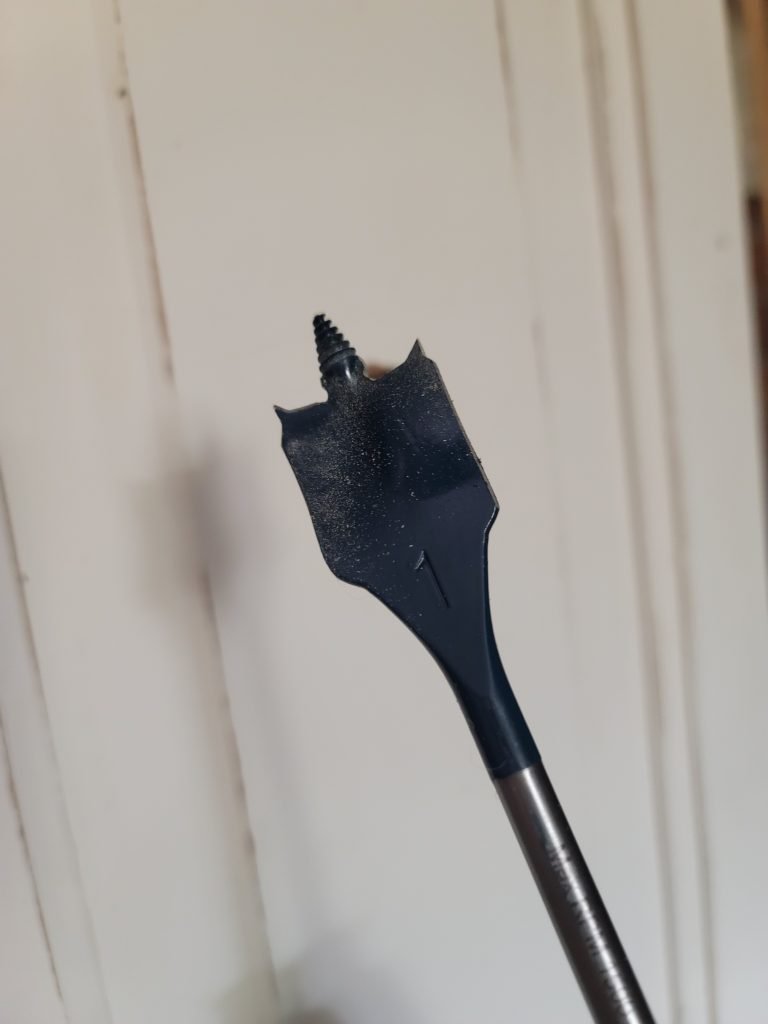
A paddle bit is a drill bit shaped like a paddle (imagine that!) that allows you to cut a circle in a piece of wood, much larger than a regular drill bit
Choose the size of your bit to be just a bit larger than the plug on your lamp wire. [see what I did there?]
The plug of the lamp wire will be pushed thru the opening once the sconces are wired.
You can order the paddle bits on Amazon, and they arrive lickety split by the amazing Amazon drivers.
The paddle bits come in a variety sizes.
To make things a bit easier for you, I did the search for you:
You can also use a hole saw bit – these are fabulous for drilling larger holes:
Once you have everything gathered, you are ready to create your portable wall sconces.
First thing you want to do is find the proper placement.
I wanted the location of the sconce to be closer to the top section of the middle panel.

I marked the holes where the screws will be drilled with a pencil.
Then I marked the center point.
That is where you place the center of the paddle bit and drill your hole in the panel.
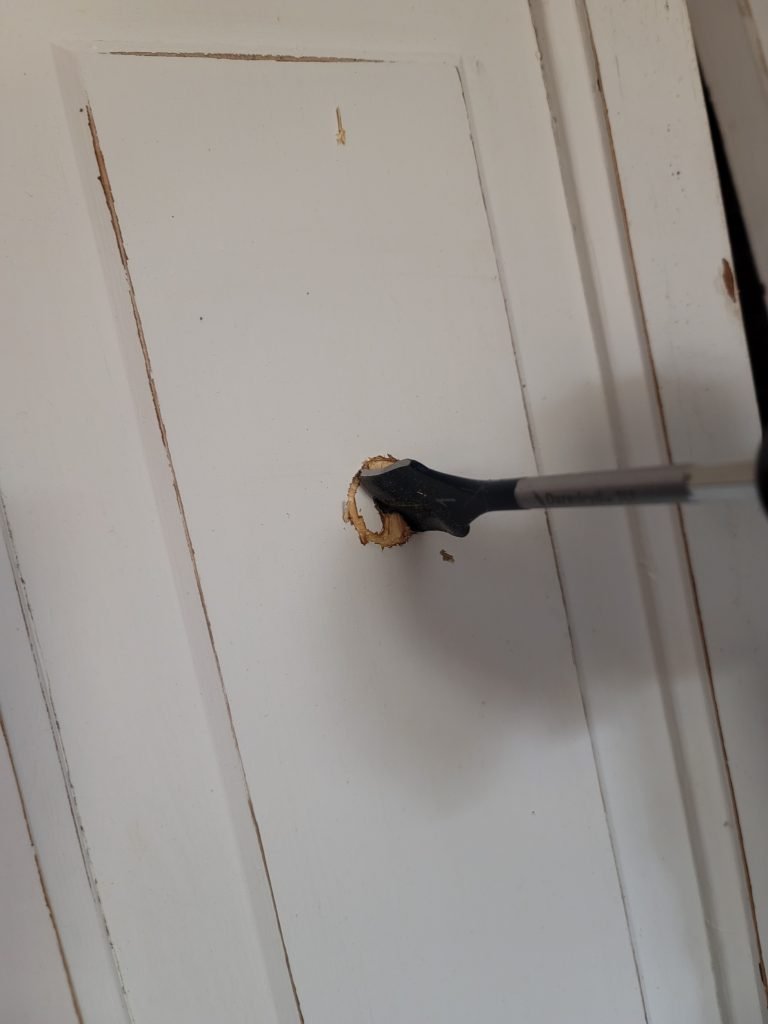
Once your hole is drilled, make sure to sand the rough spots with a bit of sandpaper.

You don’t need to go crazy with the sanding.
Sand just enough of the rough edges so that it is smooth, you don’t want to get any splinters when you feed the plug through.
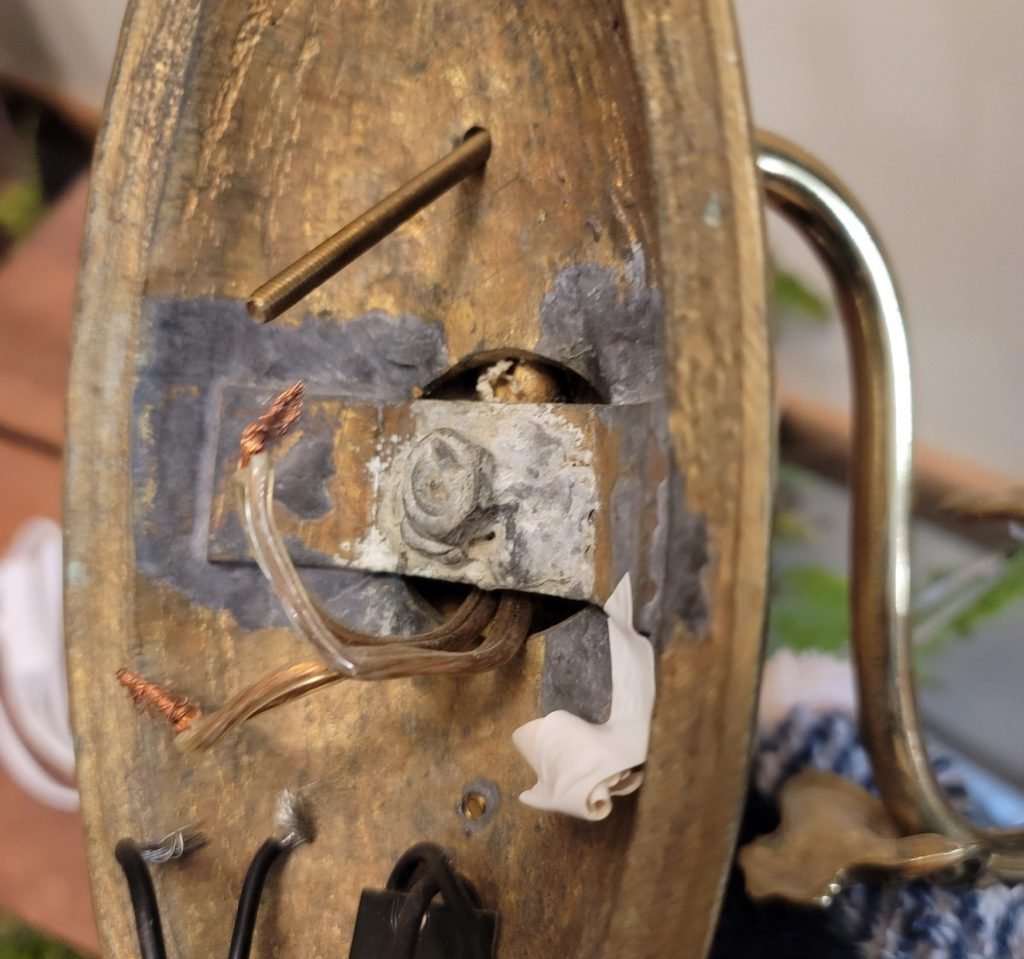
Once the hole is drilled, it is time to wire the light.
Please make sure to follow the directions that come with your lamp kit.
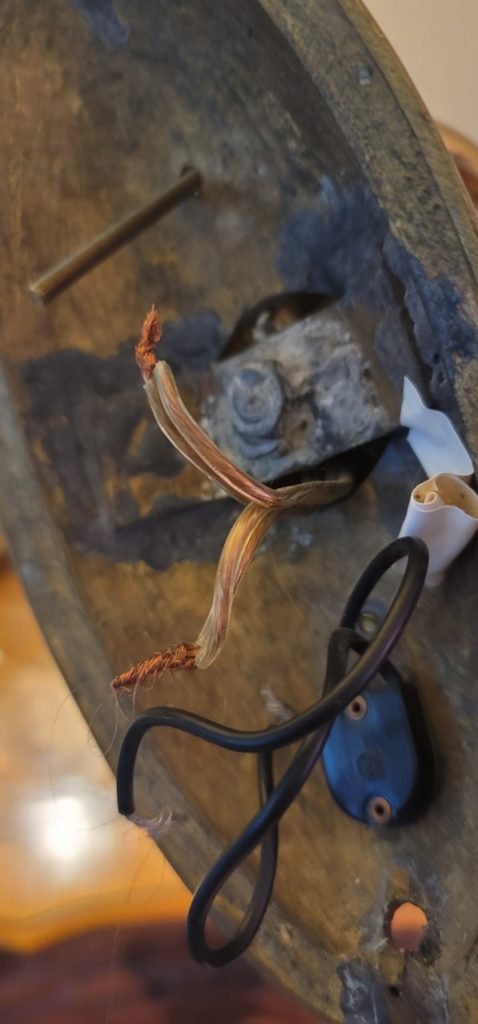

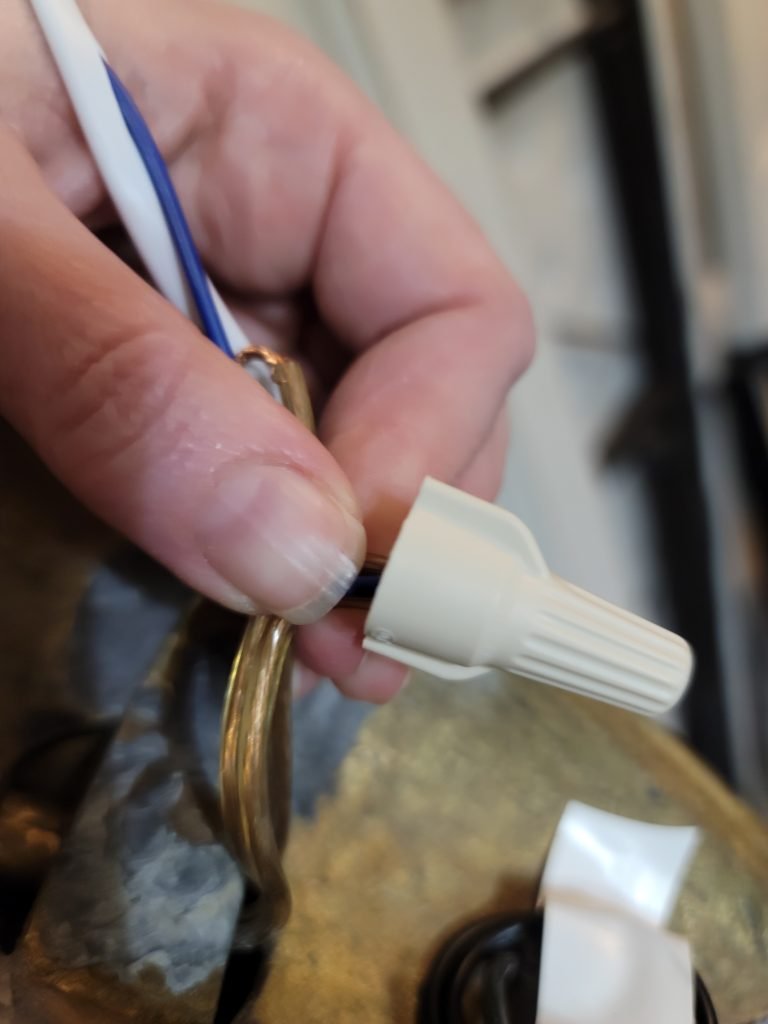
It’s super easy, you simply twist the color coded wire to the appropriate wire on the sconce and twist on the wire cap.
I like to follow up by wrapping a bit of electrical tape around the cap and wire for an extra secure hold.
Then pass the plug thru the beautifully cut hole in the wood panel and attach your sconce.
This sconce only requires 2 screws to hold the sconce securely on the wood door.

Now for the finishing touches.
I start with my favorite I have started to swap out all my light bulbs for LED. If you have ever used LED bulbs, they are so loverly. Make sure to pick the right LED bulb, prefer the daylight bulbs. I picked out some of my favorites: I always appreciate it when you click on my affiliate links to shop. Why do I post affiliate links? The more you click on the affiliate links to help support aloverlylife.com, the more free DIY’s projects I can share with you <3 and that is absolutely loverly. I appreciate your support, SO MUCH. Back to the sconces, I put them in place before I added the crystals because I didn’t want any falling off and rolling under the couch, because you KNOW that would happen. I couldn’t wait to see how they looked, BC [before crystals] so I took a quick pic. I made a pair to flank the BACC (the big a.. comfy couch) and simply tucked them behind my end tables. Did you notice that paint color of the door is close to the wall paint color. Since the doors rest on the floor, though you can hang them on the wall, and the sconces are attached to the doors I think that makes them a loverly hybrid floor lamp sconce. BTW – Did you spot Lulu’s freshly washed bed in the picture? Don’t forget to pin this project so that you can save it for later.
They don’t use a lot of energy, so it saves on your electric bill.
The light seems so natural and they aren’t the harsh blue lights anymore.
It’s a win|win situation. I do the research and recommend products that I use and love and when you click on affiliate links, I receive a small commission that helps support my blog.
The best part is that it doesn’t cost you a thing!
Until I rearrange things again, they just may end up behind the BACC.
Just look how pretty they are now that they are dripping with crystals!
This helps the floor lamp sconces blend in nicely, and the paneled wood door adds a bit of texture, too.
I am so happy with the way they turned out, just gorgeous!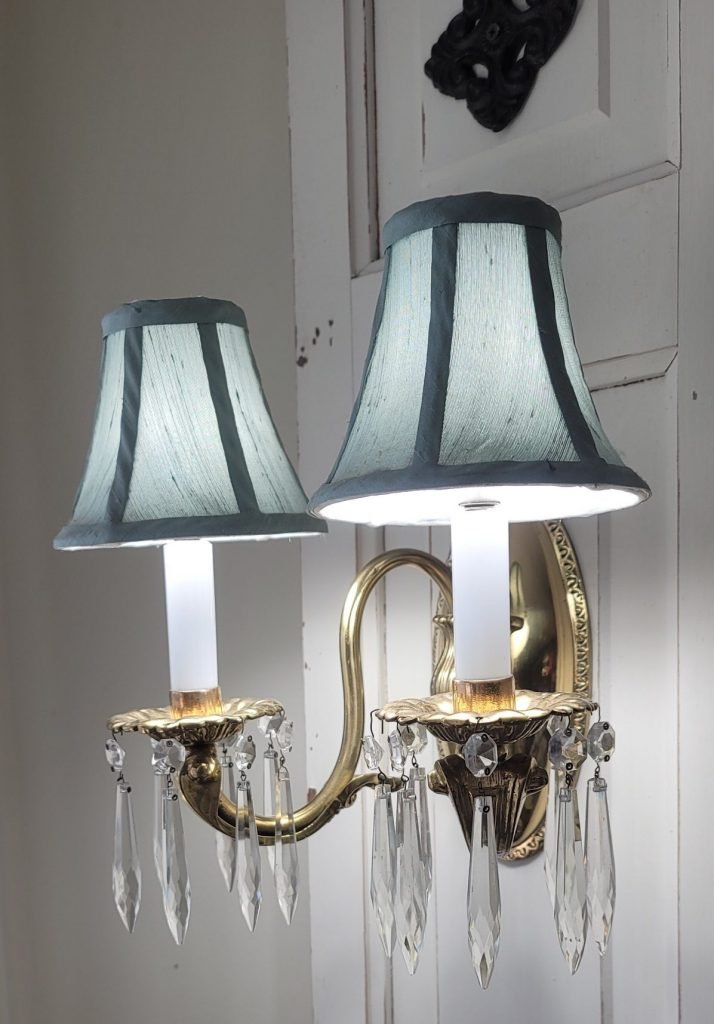
Let there be light!
Don’t they add the perfect French country cottage touch to the living room?
I think these would be really pretty flanking a bed, too.
You can find the super easy DIY over here
She is waiting for the perfect opportunity to curl up for a cat nap.


Love this idea! I wanted sconces for the herring bone wall I just finished, but I didn’t pre-plan hiding the wiring in the wall….UGH. This would have worked perfectly! Since I only hung some lighting next to the bed, I may do this in the future!
Your herringbone wall is FABULOUS – This is a great way to hang sconces anytime. I look forward to seeing your next project!
What a great deal on those sconces and such a clever way to use them in a rental. Your steps are so clear and easy to follow.
Thank you Marie.
These look fabulous. Very clever.
Thank you Carol!
Your sconce turned out beautifully. I am going to save this post for later. I am about to refresh our previous home for an airbnb and this will come in so handy. Thank you for sharing Juliet!
Thank you – these are fabulous flanking a bed, too. If you try these, let me know. I would love to see them in the airbnb [and then I can share the airbnb].
I love this idea. I hate seeing cords everywhere so this is right up my alley!
Thank you Kim. If you try the DIY and create a pair for yourself, I would love to see them!
This is so smart! They turned out so pretty. I have landlord/no permanent changes issues at my house, too.
Thank you, Jen. Rental places can have their challenges, but there are ALWAYS creative ways to get around them.
Juliet! So glad to see you at Tuesday Turn About! I hope we see you each week! Your sconce upcyle is so pretty, and so unique! Great job!
Hi Julie, Thank you for having me at the Tuesday Turn About. SO many great posts! I hope your readers enjoy the DIY. I look forward to the next TTA.
First, the sconces you scored at a great price are gorgeous! I love your idea for hanging them on a door or shutter to be able to hide the cord. Your sconces look wonderful in your living room.
Thank you, Paula.
Brilliant Juliet! (yes, low-hanging pun intended)
Every now and again, I get a bright idea – LOL
Thanks for the pun 🙂
Juliet, I love that you made your own torchiere!!! It is pretty and I like the reuse of the door. 🙂 I was happy to feature your post at Share Your Style #304 a week ago for you. Hope all is well! I’m in Tennessee just one more night but SYS will be back next week.
Summer hugs,
Barb 🙂
Thank you so much Barbara, I ended up making a pair for the living room…and I happen to have found the mate to another one I already had, so I am making a second set. I fear I have a sconce addiction, now. LOL
Such a genius idea! I love this!
Wow, this turned out great and you shared a nice tutorial. Featuring this on the Farmhouse Friday Link party this week. Thank you for sharing and hope you link up again soon!
Thank you most kindly, I will make sure to head over to look for the post!
Hi, I love your style. Your home is beautiful, and your sconces are delightful.
This looks wonderful! I can’t figure out from the pictures how you turn it on and off? Is there a button on the fixture itself?
Did you see the cord I used [link to the Amazon shop, too] there IS a switch on the cord.
It makes it SO very easy to turn on and off.
Since the door rests on the floor, how do you keep it flat against the wall if the plug is behind the door and the door is also pressed against the baseboard? I looked for this several times and didn’t see it.
It doesn’t actually sit flat against the wall. It leans at a slight angle, so the plug doesn’t get smooshed.
I have installed them before by created a 3 sided frame around the back [top and 2 sides]…I will do a follow up post to show alternative ways to hang them!
Lovely creations. I have a question about something else: what is the plant in the picture with the butterfly? I see those growing wild here and there. You mentioned a garden. Is this something we can plant or do they just grow wild?
That is butterfly milkweed – I talk about it in this post https://aloverlylife.com/perrenials_butterfly_garden/
I am not sure where you live, but it is a WONDERFUL flower to grow in your garden.
If you drop me an email with your address, I will send you one of the seed paper hearts I made with milkweed seeds in it 🙂
What a wonderful idea! Your home is so beautiful. Each corner is unique!