How to transform side tables in to a sideboard
Have you ever had a pair of side tables sitting in storage that you don’t want to part with but you just don’t know where to use them?
Maybe you don’t want to let them go for sentimental reasons or because they were a great bargain… you know what I mean.
I confess, I CANNOT pass up a good bargain when it comes to great furniture pieces!
Sometimes you can create something completely new with furniture pieces you already own.
Like this dresser (on wheels) that I turned in to a dry bar/wine rack.
This is another loverly makeover story.
Once upon a time, a pair of side tables had been sitting in storage.


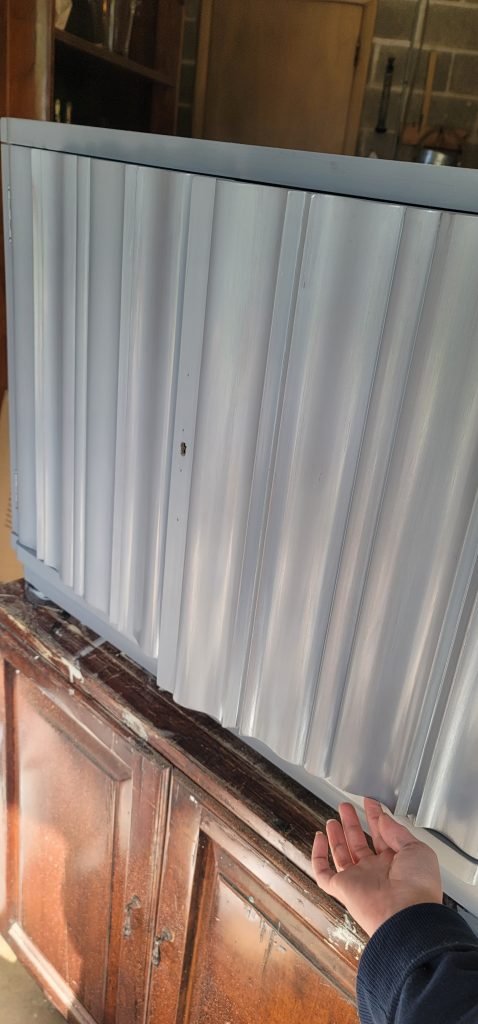
The family that inherited them, did not have a place to put them in their current home. So, they sat in the garage for a while, and got a bit beat up.
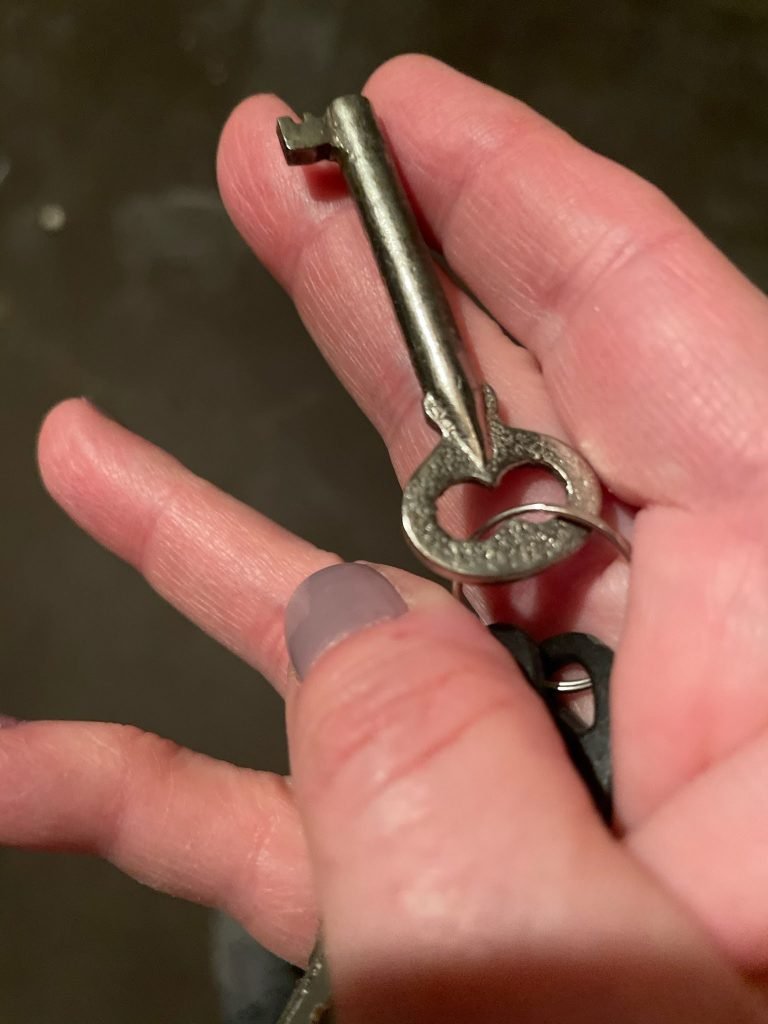
Did you see how beautiful the curvy front doors are?
Dreamy

The hardware is gorgeous, too.

They even have the original skeleton key, which is pretty amazing.
When I was contacted by the family to find a way to restyle the cabinets, the idea of transforming them in to a sideboard was a no brainer.
The were moving to a new home that needed a place for a tv/gaming area.
This is the makeover story of how I turned 2 sideboards in to one loverly sideboard.
Well now you are probably asking, “How do you transform 2 side tables into a sideboard?”
You start at the beginging
First, gather your supplies.
Here’s what you need:
SUPPLIES
- stain or paint
- shelf hardware
- L brackets
- plywood
- wood trim
- legs
- hardware to attach legs
- sandpaper
- drill
- Mr. Clean sponges
- miter saw
- brad nailer or hammer and nails
- wood glue
- measuring tape
The next step is to figure out is the length that you want the finished cabinet to be.
Sorry, you need to do a bit of math.
Measure the area that you would like the finished sideboard to fit in to, if you have a smaller space.
You can always use painters tape on the floor to visually block of the space, just to get an idea of how much space it will take up.
Or, if space isn’t an issue, think about width of the space that will be between the 2 cabinets.
Since this was going to be for a gaming area, there needed to be enough space to fit the equipment on the shelves.
22″ wide shelves were the perfect balance for the 31.75″ wide cabinets.
So I added those numbers together: 22 + 31.75 + 31.75 = 85.5
Then added 2 inches for over hang [one inch per side] to get the length of my top board.
The cabinets were only 16 inches deep, so I added 2 inches.
There will be a BIT more overhang because trim will be added to the edges so the raw wood doesn’t show, but we will get to that later on.
Voila, the measurement for my top board.
87.5″ wide x 18″ deep
The shelves would be 22″ wide and 16″ deep [2 shelves].
For a cabinet top, I recommend a beautiful piece of wood.
I headed to my favorite Lowe’s and found a great piece of oak.

I picked a beauty with a loverly grain.
Now you could take the beautiful piece of very expensive oak plywood home OR I can let you in on a secret.
Are you listening?
The people that work in the lumber department at the Lowe’s location by my house have always been AMAZING.
If you ask nicely, they will cut the wood for you (don’t forget to thank them for saving you the extra step of lugging a full sheet of 4 x 8 plywood home and cutting it yourself).
Having the wood cut a Lowes saves time and also makes it SO much easier to take the wood home.
While they are cutting the wood, you can shop for the remaining supplies, like the screw on legs and hardware,
[You can also order them from Amazon]
and your shelf hardware.
I used these pilaster adjustable brackets for the shelves.
and corner brackets to attach the top to the cabinets – you could use corner brackets for the shelves instead of the pilaster style if you don’t want them adjustable.
The cabinets were a bit short, so I am going to add height by adding legs.
You can find screw on legs that are SUPER easy to install.
Don’t forget the hardware – leg mounting plates
Here are a few of my favorites:
and finally, while you are at the hardware store [or shopping on Amazon], don’t forget your finish of choice.
For this project, the customer picked out Weathered Grey stain.

Personally, I love the Varathane products.
I use them on on so many projects, like the top on this piece
The stain colors are beautiful, and I love the stain and poly all in one.
It saves time and has a durable finish.
Now that I have my supplies ready, my wood cut [THANK YOU, again, Lowes], it’s time to head back to the workshop.
Test run
Before you start staining, set the cabinets side by side measure the shelf space between them.
Then layout your cabinets including the shelf space and set the top on to test fit and get an idea of how the top looks.
That way it you want the top a bit bigger [or smaller] you can always cut a new top.
Prep time
Prep for any piece it SO important.
Since I am staining the wood cabinets, I started by sanding the old finish off.
Head over to read my post on Sandpaper Basics for a few helpful tips.
Not only will sanding remove the old finish, but it will smooth out any dings and scratches to ensure a smooth, even finish.
It was a bit tricky to get in all the curves on the front doors, but I wanted to make sure the stain would coat evenly.


Once the sanding is done, I wiped everything down with a mix of 50/50 water and vinegar and let them dry.
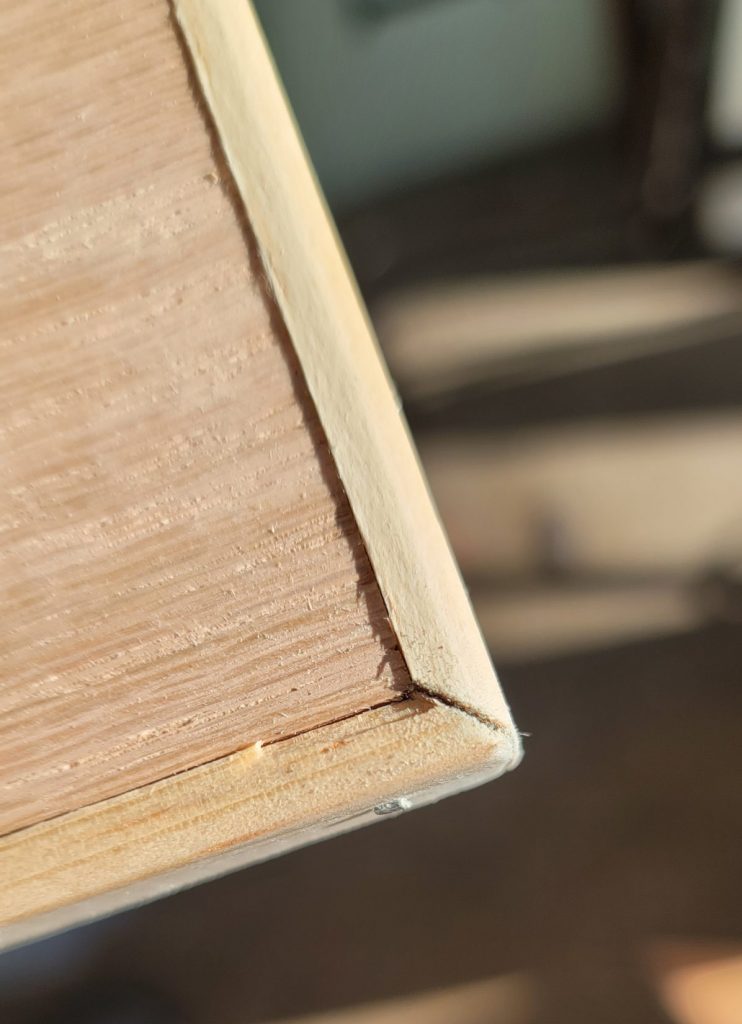
Trim
While the cabinets were drying, I started working on trim for the top and shelves.
Fresh cut wood has a raw edge, so adding trim to the perimeter of the top creates a beautiful edge.
To do this, I measured out the trim and used my Ryobi compound miter saw set at a 45 degree angle to cut the perfect mitered corners.
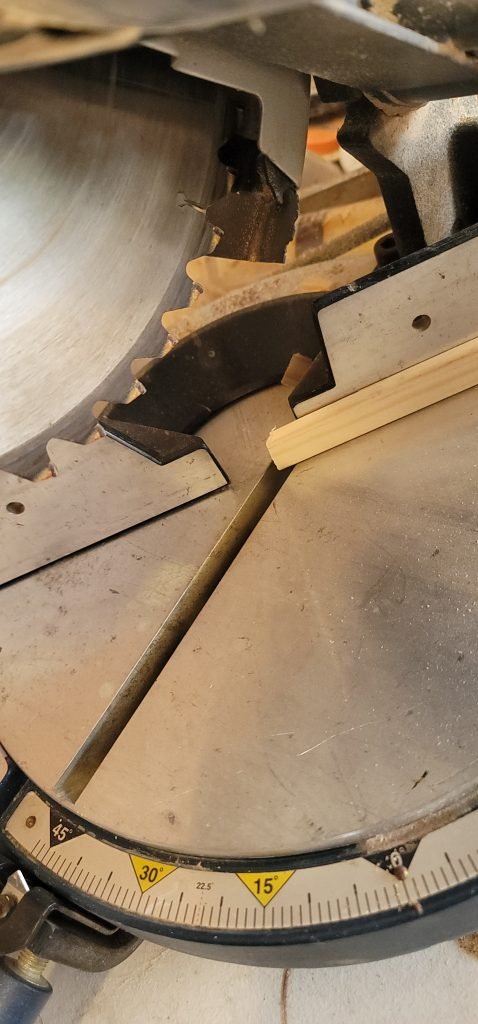
The base of the saw rotates for an easy shop cut straight or at an angle.
You can tell from the photo that my saw gets a ton of use!
I have had this one for over a decade and it works like a horse – but I am in the market for another.
Here are a few of my favorites:
Once the trim is cut, I secured it with wood glue and brad nails.

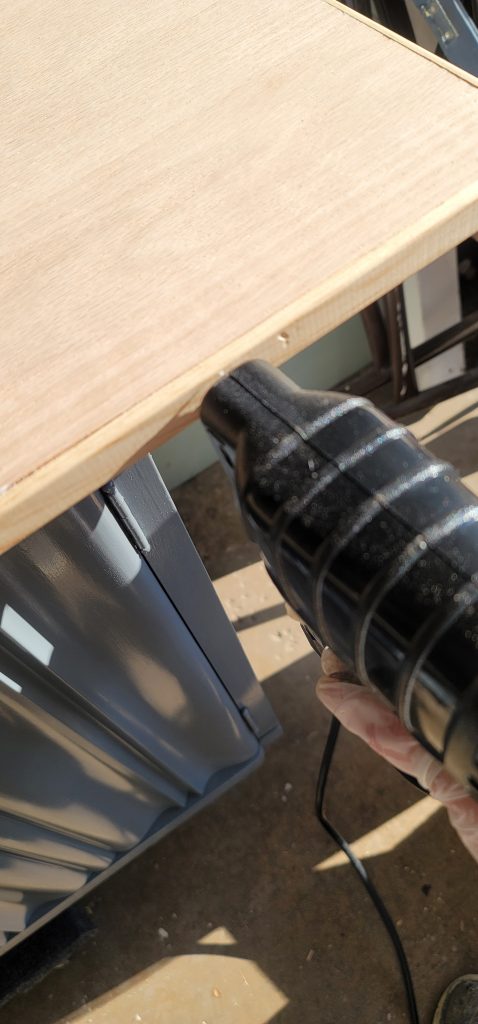
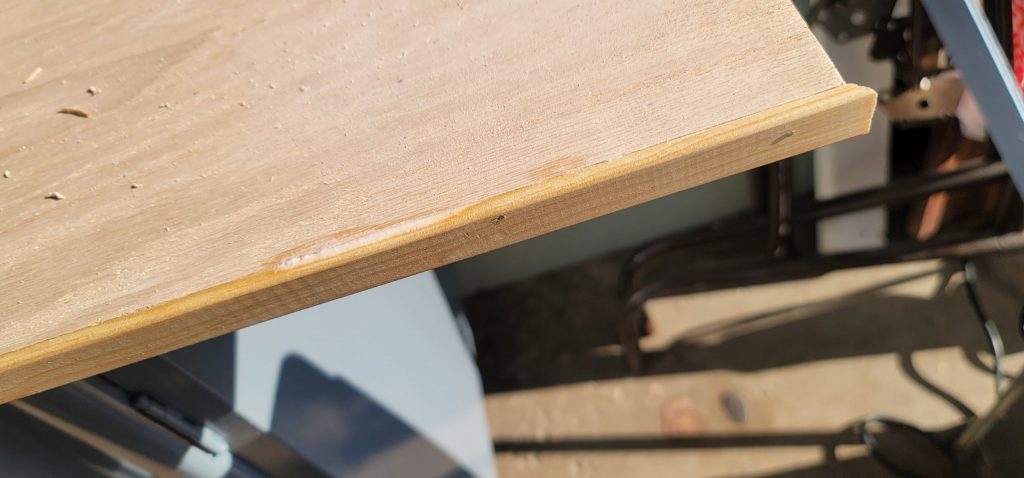
The trim finishes off the edges nicely.
Here’s the non finished side.

Just look at this beautifully mitered corner – I get that skill from my grandpa, the cabinet maker.
Time to stain the wood
Before you stain, use a fine grit sand paper to prep your shelves sideboard to.
For the stain, I used Varathane Weathered Grey, it is such a beautiful finish.
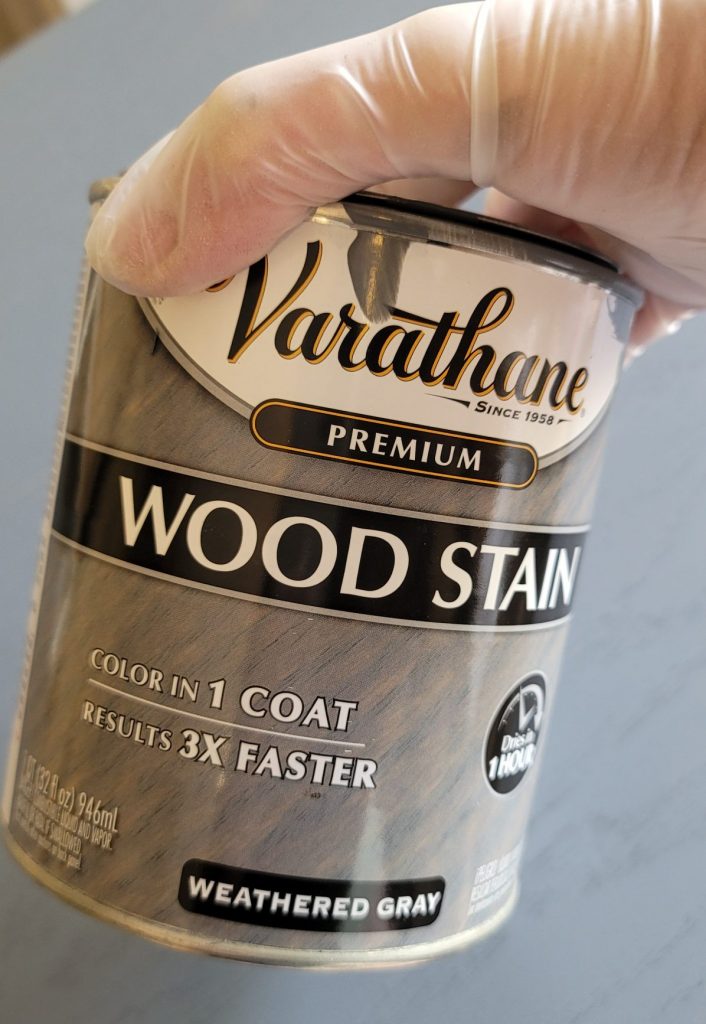
Follow the directions on the can.
This stain you apply with a brush and let sit for a bit before wiping off.

This stain is oil based, so I just use the cheap chip brushes because it is SO HARD to clean oil based products.
Here’s the best tip, it comes from Mr. Clean
You know those Magic Eraser sponges? They are FANTASTIC for staining [and for smoothing topcoats].
It wipes off the excess and leaves a smooth lint free finish behind.
Use the sponge to gently wipe the excess stain from the wood.
Brush on and wipe off, continue to stain each piece and let them cure according to the brand you are using prios starting the next coat.

The Weathered Grey Varathane finish is like silk (opposed to my wheeled painting cabinet the stained cabinet sits upon).
I am swooning.
Note to self, don’t forget to stain the legs!
As for the hardware, I just gave it 2 coats of gun metal spray paint

Time to assemble
One the stain has cured, it is time to assemble the sideboard.
I started by installing the legs on the bottom.
Kindly forgive me, but I was on a roll and forgot to take photos of the leg assembly.
You just screw the plates to the bottom corners of the cabinet and screw the legs into the plate, VOILA legs and height!
Next I added the shelf hardware.
Make sure to measure and mark proper placement so that both sides are the same – and level!
You don’t want your shelves to be wonky.

Place your shelves on the supports before you install the top – just in case your measurements are off.
If you install the top first, the shelves may not fit!
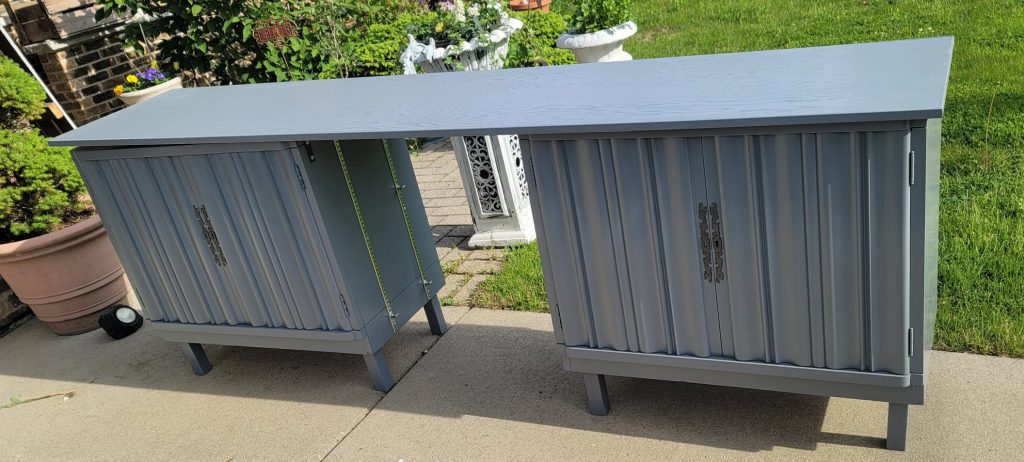
Then I used L brackets to attach the top.
You can see it peeking underneath the top on the left hand side.
The L brackets are what secures the pieces together to make a sideboard out of the 2 side tables.
As I was moving the new sideboard to get ready for pickup, the customer showed up a bit early, so I didn’t get the full pic before we loaded it.
The top only looks warped because my driveway is at an angle.
Let’s draw your attention to the beautiful legs.
Thankfully, they were kind enough to send me a picture of the sideboard in their new home.

The cool thing is, if they ever want to return the sideboard to the 2 side tables, they just need to remove the hardware and fill in the holes.
Quite a transformation, isn’t it?
It was so fun to transform the 2 side tables in to a sideboard so that the pieces can be used in their new home, but provides function for the entertainment ares.
This is just one way to shop your house for furniture that can be reused in your home in creative ways.
Time for a new project – a bientot, Juliet
Did you like the side table to sideboard makeover? Pin it for later or share it


Wow! This is amazing! Such a great idea and it turned out fabulous!
Thank you most kindly Amy, I wish I had a chance to style it with some of your fabulous recipes, LOL
Your sideboard came out so beautifully! Thank you for sharing how you did it!!
what a great idea and such detailed instructions. Looks fantastic!
Thank you so much for stopping by Deborah – I am glad you liked it.
Juliet
This looks fantastic! I never would’ve thought to do that, and will have to give it a try when we’re ready to recycle our end tables.
Thank you – I love a good furniture makeover with a twist, did you see my dresser that I turned in to a dry bar?
If you get the chance, take a peek https://aloverlylife.com/2020-10-06-chalk-painted-dresser-with-a-twist/
What an amazing project! My husband loves woodworking projects, I’m sending him this idea (We have some side tables just taking up space in the garage!)
Thank you. If you end up creating a sideboard, I would love to see it!
Juliet
Beautiful transformation! I just bought that exact same product in weathered grey but decided that the color would not look right on the style of my project. So I purchased another color in the same product but did not return the weathered grey because I want to use it on something one day. It does look dreamy. Thanks for sharing the project so I could see how beautiful the color is. #HomeMattersParty
Oh, now I want to know what color you ended up using and to see a pic of the finished project!
Weathered grey is so loverly, I am sure you will find the perfect project for it!
This transformation is gorgeous! I bet they were so excited!!
Great job. Such a creative idea. The end result looks fabulous.
Wow thus project is amazing. You had a vision and made it a reality.
Just beautiful!
Wow, wow, wow!!!! I absolutely love this!!! What a brilliant idea! Love the look and the color!
Thank you Melba.
You are so creative! The end result looks amazing. Thank you for the Magic Eraser tip. Can’t wait to try it.
Thank you Paula. The Magic Erasers are great for staining and top coats. I use them on so many things. Not sure if you have a Menard’s by you, but they have a generic version in a pack that is often on sale for $1!
Great idea! Love this … and the gray stain is beautiful!
Thank you, sometimes a pair of side tables can be so much more 🙂
What a great idea! Your steps are very thorough too.
Thank you Marie.
That is crazy creative!!
Thank you, Kim
impressive!
Amazing work!! I love furniture and love your idea. Thank you for sharing.
Wow! They must have been thrilled with this makeover, I know I would be – great tutorial!
Looks fabulous but the TV is too big for it.
You may think that the TV is too big for it, but it worked for the customer.
They were happy with it, and that is what is important!